CCBill
CCBill payment gateway
CCBill integration is included by default with the software.
Note that billing cycle for recurring subscriptions in CCBill is determined in days. For example if your subscription is configured to recur every 2 months, users will be charged every 60 days. You may not have subscriptions longer than 365 days in CCBill.
Also note that non-recurring subscriptions will see a “2 days” term on the CCBill payment form. This is due to a technical restriction CCBill has for non-recurring subscriptions. Users will still receive whatever term you have specified in the control panel.
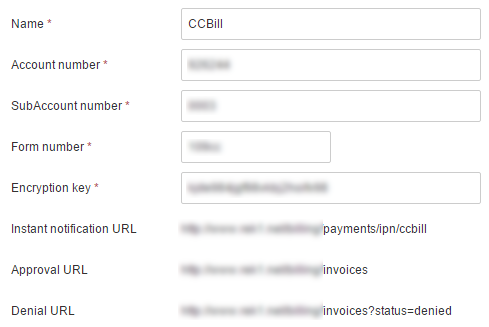
Fill in your CCBill account and subaccount numbers. For the rest of the settings it is necessary to configure a few things in your CCBill account first. Please ensure the CCBill settings are correct, or the payment module will not work.
Enable dynamic pricing
Please work with your CCBill support representative to activate “Dynamic Pricing” for your account. You can verify that dynamic pricing is active by selecting “Feature Summary” under the “Account Info” tab of your CCBill admin menu. Dynamic pricing status appears at the bottom of the “Billing Tools” section.

Create encryption key
You must contact CCBill Support to generate your encryption key. Once set, it will be visible under the “Advanced” section of the “Sub Account Admin” menu. It will appear in the “Encryption Key” field of the “Upgrade Security Setup Information” section. Copy it to CCBill settings page on your site.

Disable user management
In your CCBill admin interface, navigate to “Sub Account Admin” and select “User Management” from the left menu. Select “Turn off User Management” in the top section. Under “Username Settings,” select “Do Not Collect Usernames and Passwords.”

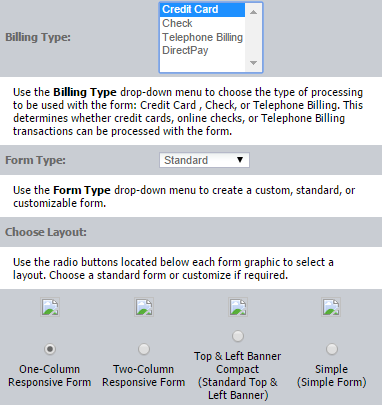
Creating a new billing form
The billing form is the CCBill form that will be displayed to customers after they choose to check out using CCBill. The billing form accepts customer payment information and processes the payment. To create a billing form navigate to the “Form Admin” section of your CCBill admin interface. All existing forms will be displayed in a table. Click “Create New Form” in the left menu to create your new form. Select the appropriate option under “Billing Type.” (In most cases, this will be “Credit Card.”) Select “Standard” under “Form Type” unless you intend to customize your form. Select the desired layout, and click “Submit” at the bottom of the page.
In this example, our new form is named “109cc.” Type in this form name in the respective text box on CCBill settings page on your site.

Configure return URLs
In your CCBill admin interface, navigate to “Sub Account Admin” and select “Basic” from the left menu. Fill in “Approval URL” and “Denial URL” text boxes with values displayed on CCBill settings page on your site.

Configure webhooks
In your CCBill admin interface, navigate to “Sub Account Admin” and select “Webhooks” from the left menu. Fill in “Webhook URL” text box with the value displayed on CCBill settings page on your site. Make sure to check “all” check boxes on this page too.

Your CCBill account is now configured. In your CCBill admin interface, navigate to “Sub Account Admin” and ensure the information displayed is correct.